We were looking for something fun and easy to do with our students this month that didn’t require all sorts of special supplies and that would bring a little cheer into everyone’s lives. We came up with this cute little tulip craft, and we hope it brings you joy as well!
Materials:
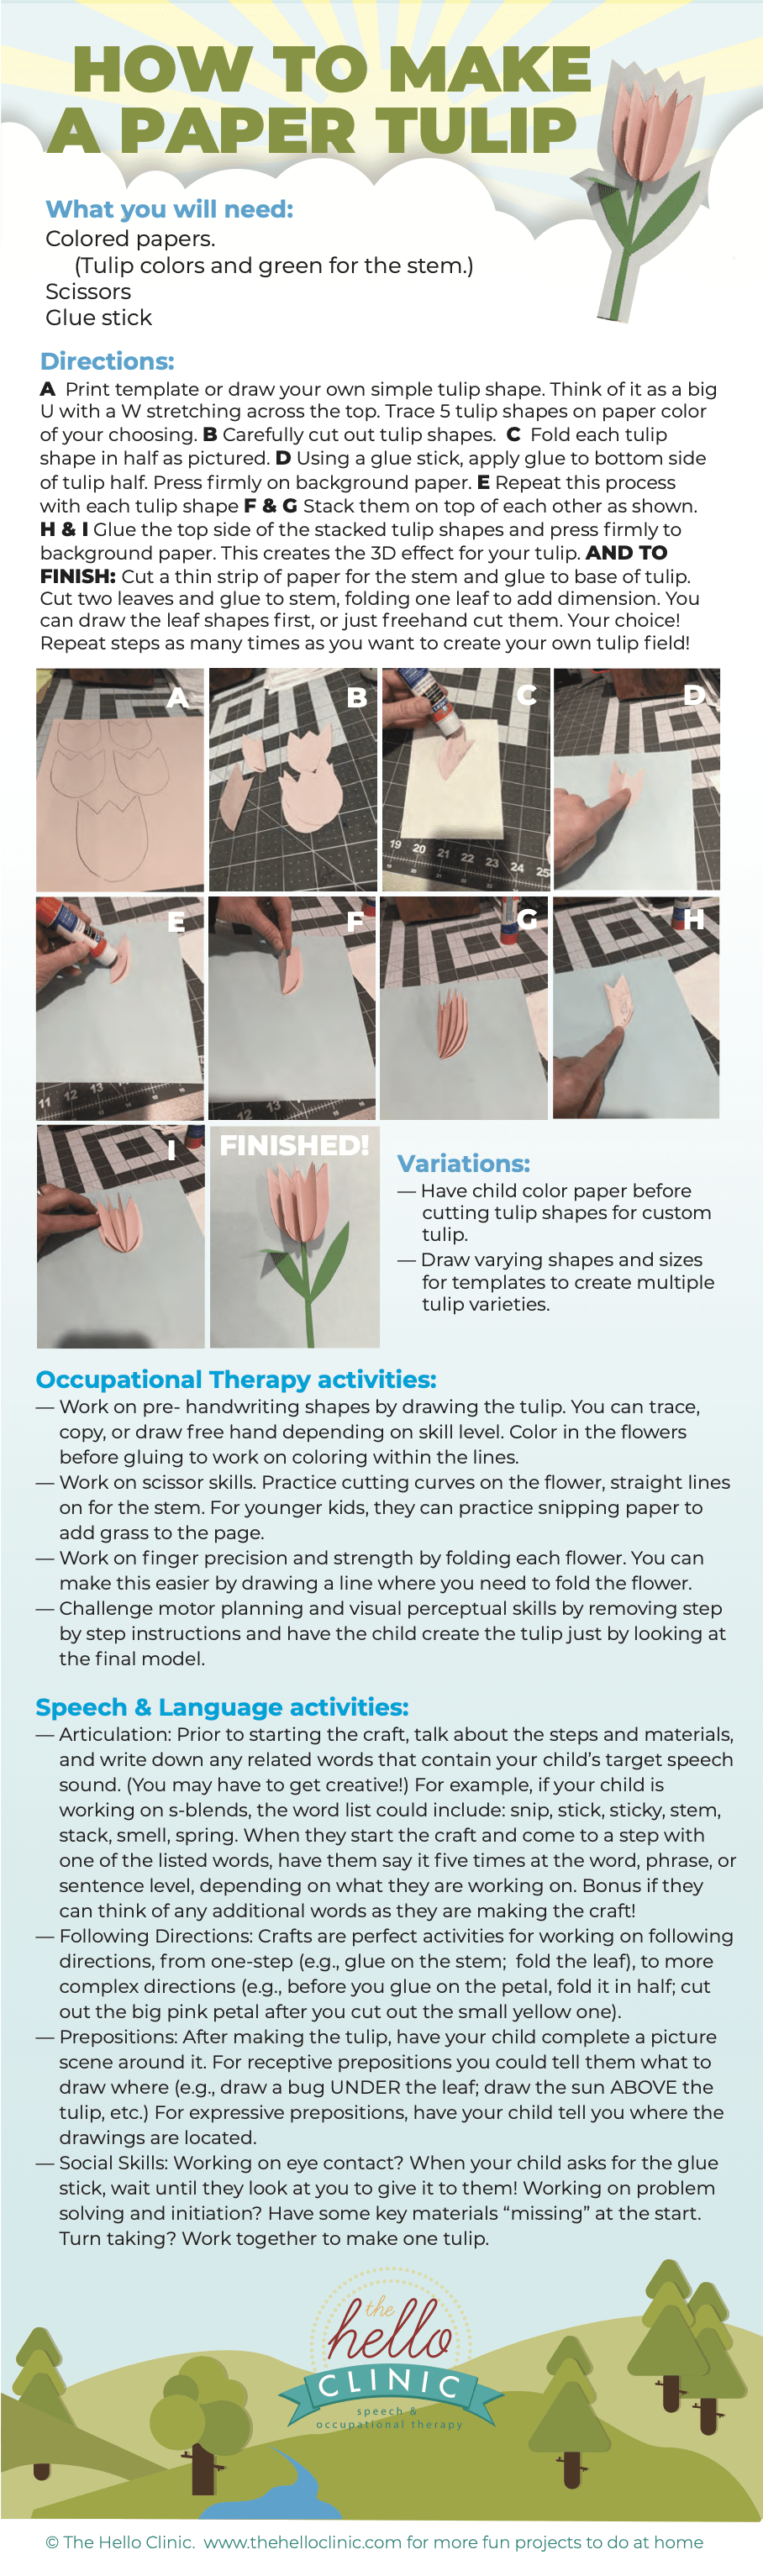
- Colored papers (tulip colors and green for the stem)
- Scissors
- Glue Stick
Directions
- Print a template or draw your own simple tulip shape. Think of it as a big U with a W stretching across the top.
- Trace five tulip shapes on paper color of your choosing.
- Carefully cut out tulip shapes.
- Fold each tulip shape in half.
- Using a glue stick, apply glue to the bottom side of the tulip half and press firmly on the background paper.
- Repeat this process with each tulship shape.
- Stack them on top of each other as shown.
- Glue the top side of the stacked tulip shapes and press firmly to the background paper. This creates the 3D effect for your tulip.
- Cut a thin strip of paper for the stem and glue to the base of the tulip.
- Cut two leaves and glue them to the stem, folding one leaf to add dimension. You can draw the leaf shapes first or just freehand cut them, your choice!
Repeat steps as many times as you want to create your own tulip field!
Variations
- Have the child color paper before cutting tulip shapes for custom tulips.
- Draw varying shapes and sizes for templates to create multiple tulip varieties.
Occupational Therapy Activities
- Work on pre-handwriting shapes by drawing the tulip. You can trace, copy, or draw freehand depending on skill level. Color in the flowers before gluing to work on coloring within the lines.
- Work on scissor skills. Practice cutting curves on the flower, straight lines on the stem. For younger kids, they can practice snipping paper to add grass ot the page.
- Work on finger precision and strength by folding each flower. You can make this easier by drawing a line where you need to fold the flower.
- Challenge motor planning and visual perceptual skills. Remove step-by-step instructions and have the child create the tulip just by looking at the final model.
Speech and Language Activities
- Acticulation: Before beginning the craft, discuss the steps and materials, and note any related words that include your child’s target speech sound. (You may have to get creative!) For example, if your child is working on s-blends, the word list could include: snip, stick, sticky, stemp, stack, smell, spring. When they start the craft and come to a step with one of the listed words, have them say it five times at the word, phrase, or sentence level, depending on what they are working on. Bonus if they can think of any additional words as they are making the craft!
- Following Directions: Crafts are perfect activities for working on following directions, from one-step (e.g., glue on the stem; fold the leaf), to more complex directions (e.g., before you glue on the petal, fold it in half; cut out the big pink petal after you cut out the small yellow one).
- Prepositions: After making the tulip, have your child complete a picture scene around it. For receptive prepositions, you could tell them what to draw where (e.g., draw a bug UNDER the leaf; draw the sun ABOVE the tulip, etc.) For expressive prepositions, have your child tell you where the drawings are located.
- Social Skills: Working on eye contact? When your child asks for the glue stick, wait until they look at you to give it to them! Working on problem solving and initiation? Have some key materials “missing” at the start. Turn taking? Work together to make one tulip.
This craft is a great way to welcome (or encourage!) the arrival of spring, even when the weather is stuck in winter mode. As always, our clinicians have shared a few ideas on how you can sneak in some work on goals while you make it. One of our invaluable OTs included ideas that target handwriting, coloring, scissor skills at every level, finger precision, and motor planning. Our SLPs gave tips on how to target articulation, following directions, location concepts, and social skills.